


Next: 2.2 Changing the Document
Up: 2 Document Editing
Previous: 2 Document Editing
Subsections
Figure 2.1:
TCM main window.
![\begin{figure}
\begin{center}
\includegraphics [width=5.5in]{p/mainwindow.ps}\end{center}\end{figure}](img4.gif) |
When you start up an editor, you will see the so-called main window.
For a screen dump of the main window see
figure 2.1. To be able to work with TCM you
need a two- or three-button mouse.
In this manual they are called from left to right: button-1,
button-2 and button-3 (or from right to left, if you have a
special left-hand adjusted mouse).
You can always work with two buttons because button-3 is only used for
popping up the Edit pop-up menu in the drawing area,
whereas the same menu is also accessible via the menu bar.
Except the basic drawing commands in the drawing area, all parts
of the user interface can be accessed by keystrokes as well as
by mouse operations. This manual assumes that you are using
the mouse as much as possible.
On the left edge of the main window of the diagram and tree editors
there are two sets of tiled buttons containing a bitmap symbol.
These contain two kinds of toggle buttons: radio buttons and check buttons.
Radio buttons are a set of mutually exclusive selection options.
The visual cue is a little diamond that is filled or unfilled.
A check button is a non-mutually exclusive selection option.
The visual cue is a little box that is filled or unfilled.
When you pass the mouse pointer over a tiled button for a second or two,
a one line bubble help clue is popped up giving the
full name of what the tile represents.
The menu bar located under the main window's title bar organizes most
of the commands and features of the editors.
The menu bar works in a straightforward way: press button-1
on an entry and keep it pressed down. A pull-down menu appears. Drag
the mouse to the desired command and then release button-1.
The menu is dismissed and the command is
executed. Some menus contain nested submenus, called cascading menus,
that work in a similar way.
You cancel a menu by moving somewhere outside the menu and then
releasing button-1.
Some frequently used commands can also be called directly, without going
through a menu, by means of a keystroke shortcut, called
an accelerator.
For example <Ctrl+L> is an accelerator for loading a document
from file. You can see in the text of the menu entries which
commands have an accelerator.
Some menu entries contain check buttons that indicate
that a certain property of the editor is switched on or off.
If you select this entry, the value of the property will be inverted.
See for example the Show Page Boundary entry in the Page menu.
Some other menu entries contain a submenu of radio buttons
indicating that a certain editor property has a value
that is one from a set of menu choices. Try for example the
Page Size entry in the Page menu.
The drawing area, also called pane or canvas, is used
to create, edit and delete the graphical items of your document
by using the mouse. The mouse operations that are distinguished
by TCM are summarized in figure 2.2.
Figure 2.2:
Mouse operations.
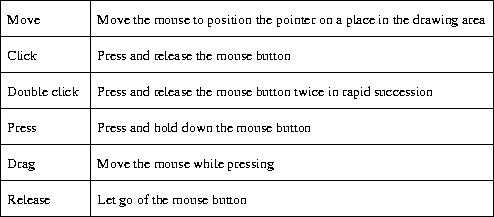 |
The whole drawing area is larger than the main window. You can use the
scroll bars on the right and bottom side of the drawing area to view the
drawing area that requires more space than is available at any one time.
By resizing the main window you can resize the visible part of the drawing area,
keeping the other parts of the main window the same size as
much as possible.
TCM has its own coordinate system. By default, the TCM coordinates
have the same distance as the coordinates of X Windows.
The origin is in the top left corner of the drawing area.
Like the X Window coordinates, the x-coordinates increase from left to
right and the y-coordinates increase from the top down.
By zooming in or out the ratio between the TCM and X Window coordinates
can be updated.
This is visible as an uneditable text field
above the drawing area. See figure 2.3 for how the
document types are called.
This is visible as an editable text field
above the drawing area. See section 2.2 for how
to change the document name.
This is visible as a toggle above the drawing
area. When the document has been modified, but it is not saved yet,
it is on. If the toggle is on and you have loaded or created
a new document, TCM warns you that the old document will
be lost, and you get the opportunity to save the old document first.
The result of the last issued command is displayed
below the drawing area in an unshaded and uneditable text field.
The name of the project or working directory
is visible in an editable text field at the bottom of the main window
right below the status area. See section 2.3 for
how to change the project directory.
The current zoom percentage is shown
in the bottom-right corner. By performing the zoom commands
of the Zoom menu this value is updated.
This is visible as a toggle beneath the
status area. When it is on, the shapes in the diagram or the cells
in the table are automatically resized to make it fit the text
that they contain (see section 2.5).
This is visible as a toggle beneath the status
area next to the autoresize toggle. When it is on, text can be typed
directly into the drawing area. When it is off, text editing
takes place in a text edit dialog (see section 2.5).
In the bottom-left corner of the main window
there are four arrow shaped buttons by which you can move the
entire document over the drawing area. Amidst these four buttons there
is a button labeled C, by which you can center the drawing
on the first page in the drawing area, at least when the drawing
is not larger than a single page. When the drawing is larger than
one page, the drawing will be centered on the group of pages
that the drawing occupies.
Figure 2.3:
Document editors, document types and document name suffixes.
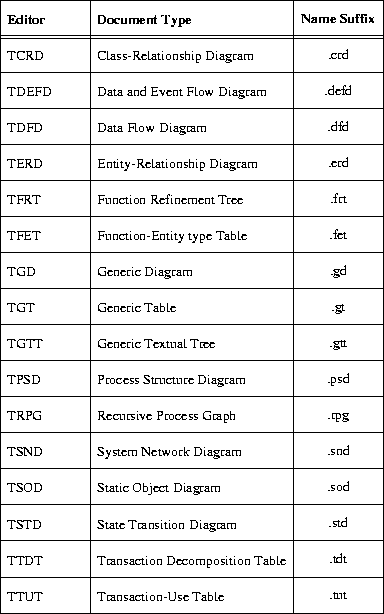 |
Next: 2.2 Changing the Document
Up: 2 Document Editing
Previous: 2 Document Editing
Frank Dehne,Faculty of Mathematics and Computer Science, Vrije Universiteit Amsterdam
11/17/1997